
Автор статьи
Глеб Антоненко


Why clear the space?
If your Bitrix24 does not have enough space, this will negatively affect all functionality: you will not be able to upload new files to Disk, you will not be able to attach attachments to the feed, etc.
If you have a boxed Bitrix24, then the lack of space on the server disk can lead to complete inoperability of the system.
How to track available space in Bitrix24
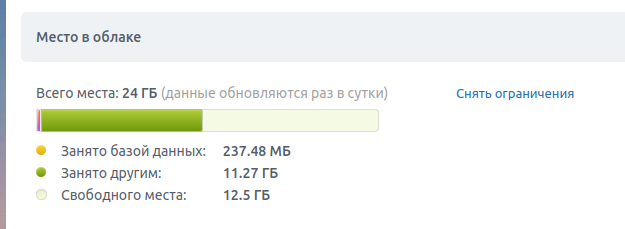
Cloud
Menu → My tariff → section “Space in the cloud”
Box
The command is executed on the serverdf -Th:

The Use% column shows the percentage of disk usage. It is desirable that it is no more than 90%.
You can also connect external monitoring to the server, which will monitor, among other things, free space (for example, Zabbix).
How to see what is occupied by a space
For the cloud and the box
Run the Bitrix24 Disk Cleanup Wizard one by one:
- Disk → Clean up space → Switch to expert mode → Start scanning
- CRM → CRM Settings → Other → What is taking up space → Start scanning
These experts will show you what is occupied by the space and offer cleaning options.
How else to solve problems with space for the box
- Expand the disk (on the hosting, virtual machine settings). Then expand the file system Instructions:https://dev.1c-bitrix.ru/learning/course/?COURSE_ID=37&LESSON_ID=8887
- Database optimization
Admin panel → Performance → Tables, sort tables by size. Compare with table sizes on the server
/var/lib/mysql/. If the latter are significantly larger, then there were mass deletions of records, and it makes sense to optimize. Run the commandmysql optimize table [table name]Important: This operation requires space because an optimized copy of the table is first created and then the old version of the table is deleted.
- Check backups, maybe reduce their number
- To solve the issue with space radically, it is recommended to connect external S3 storage. Then the server will be able to use additional space for storing files.
Connect external S3 storage
Create S3 storage on one of the providers, for example:
Set up cloud storage in Bitrix24:https://dev.1c-bitrix.ru/learning/course/index.php?COURSE_ID=35&LESSON_ID=3102(Pay special attention to the rules. If we want all files from all Bitrix modules to be uploaded to the S3 storage, then we leave one empty rule.)
Next, you need to check/configure nginx for fast file delivery from S3 (in this case, PHP is used only to check access to the file, and the file itself is delivered via nginx, bypassing PHP). To do this, look at the file/etc/nginx/bx/conf/bitrix_general.conf. It already has ready-made settings for some S3 providers. If there is none for your provider, you need to add it. Here is an example for Timeweb:
    # Timeweb.cloud
    location ~ ^/upload/bx_cloud_upload/(http[s]?)\.([^/:\s]+)\.timeweb\.cloud/([^\s]+)$ {
        internal;
        resolver 8.8.8.8 ipv6=off;
        proxy_method GET;
        proxy_ssl_server_name on;
        proxy_set_header X-Real-IP $remote_addr;
        proxy_set_header X-Forwarded-For $proxy_add_x_forwarded_for;
        proxy_set_header X-Forwarded-Server $host;
        more_clear_input_headers 'Authorization';
        proxy_set_header "cookie" "";
        proxy_set_header "content-type" "";
        proxy_set_header "content-length" "";
        proxy_pass $1://$2.timeweb.cloud/$3;
    }
After that, you can enable the “Fast file delivery via Nginx” option in the main module settings if it was disabled.
To check, upload a new file, make sure that it opens and downloads normally from the portal.
Next, you can upload existing files to S3. To do this, in the context menu of the created storage in Bitrix24, select “Move files to cloud storage”.
Have questions or need to find a solution to Your problem?
Leave a request by filling out the feedback form. Our expert will contact you as soon as possible